Recipe of the Month: Blood Orange Meringue Tart

Between working full time and planning and hosting Food With Friends, I don’t get to play in the kitchen as much as I would like. However, this weekend, I couldn’t resist the blood oranges at the farmer’s market. The beautiful winter citrus plus an insatiable love of meringue, resulted in this dessert that combines so many of my favorite flavors.

Blood Orange Meringue Tart

Serves: 8-10

Processed with VSCOcam with f2 preset

Ingredients

Crust:

12 Graham Crackers

5 tablespoons butter, melted

¼ cup granulated sugar

1/8 teaspoon salt

2 teaspoons candied ginger, finely chopped

Filling:

1 cup blood orange juice

½ a lime

4 egg yolks (Save the whites)

4 tablespoons butter

¾ cup granulated sugar

Meringue:

4 eggs whites

1 ½ cups granulated sugar

½ teaspoon cream of tartar

2 teaspoons orange zest

What you’ll need:

Cuisinart

Mixer (handheld or standup – or a whisk and some highly developed biceps)

9 inch pie or tart shell

Steps

Preheat the oven to 350 degrees

  1. To make the crust: combine the graham crackers, sugar, salt and candied ginger in the Cuisinart and pulse until you have a fine crumb. Add the melted butter and continue to pulse until the butter is fully incorporated and the mixture clumps together between your fingers.
  2. Pour the crumb mixture into a pie or tart shell and use the back of a dinner spoon to press it evenly into the pan. Bake for about 12 minutes, until the edges begin to brown.

Processed with VSCOcam with f2 preset

  1. To make the filling: zest two of the oranges and set it aside for the meringue. Juice the oranges and lime, making sure to taste for sweetness and acidity. Add the juices to a small pot set over a medium heat and reduce by half, about 7-10 minutes.
  2. In a small bowl, combine the egg yolks and sugar, whisking them together until they are pale yellow and airy.
  3. Working quickly, so the yolks don’t cook, add the reduced juice to the egg and sugar mixture, whisking until combined. Return the mixture to the small pot and stir in the butter.
  4. Over a medium-low heat, cook the blood orange curd, stirring constantly, until it’s thickened and evenly coats the back of a spoon, about 3-5 minutes. Once its thickened, remove from the heat and let it cool for about 15 minutes.
  5. Pour the curd into the bottom of your tart shell and bake for about 12 minutes, until it begins to set. Take it out of the oven and let it cool.

Processed with VSCOcam with c1 preset

  1. To make the meringue: Put the egg whites in a bowl and mix on a high speed for about 7 minutes, until the whites are thick and frothy. Add the cream of tartar and slowly incorporate the granulated sugar, continuing to mix for another 5 or so minutes. Once you’ve got your meringue to a stiff peak, add your orange zest and whisk to combine.

Processed with VSCOcam with f2 preset

  1. Pile the meringue on top of the blood orange curd, using a spatula to smooth the top.
  2. Place the pie back in the over for another 10-12 minutes, just until the meringue is slightly golden.
  3. Remove from the oven and let it cool before serving.

Processed with VSCOcam with f2 preset

Written by Carter Goffigon

unnamed

New in Dallas: Snap Kitchen

Photo Courtesy of Snap Kitchen

Thanks to Snap Kitchen, fast food is no longer synonymous with greasy burgers and chemical-ridden milkshakes. In April 2010, restaurant veterans Matt Reinhart and Andrea Hinsdale founded Snap Kitchen to meet the food needs of their families. The mission of Snap Kitchen is to provide healthy, flavorful, and convenient take-away food that is handmade daily. At Snap, you’ll find a carefully curated wall of food items – everything from a glazed salmon fillet, to green juice, to a pre-workout granola bar. What you won’t find? Pre-packaged, processed, and globe-trotted foods.

Snap Kitchen is the perfect solution for people with busy schedules who don’t have the time to cook a well-rounded dinner. All packaged meals are portion controlled, which not only aids many in maintaining a diet, but also helps to cut down on large amounts of food waste. Snap is an easy go-to for those who have restrictive food allergies. 98% of the menu items are gluten free, and each package is carefully labeled to indicate the items that are dairy-free, vegan, paleo, etc. Other aspects of Snap that we love include their preference for local ingredients, recyclable packaging, efforts towards sustainability, and the fact that at the end of the day they donate their leftover food to homeless shelters.

Preston Royal Village 10

When I went to Snap Kitchen last month, I visited with Snap Kitchen Dallas’ registered dietitian, Daniel Magoon. Each city with a Snap Kitchen – Austin, Houston, and Dallas – employs a highly trained dietitian to help customers design eating plans and meet their health goals. Dallas’ registered dietitian has a background in the psychology behind food – i.e. understanding and changing the way a child feels about broccoli. Daniel’s health mantra is “healthy not skinny,” which we at DFW Beauty Guide couldn’t agree with more.

To get healthy in the New Year, Daniel’s first bit of advice is to understand that diets don’t work. Getting healthy is about committing to a lifestyle change. Daniel suggests prioritizing hydration, being mindful of the food you are ingesting, and listening to internal hunger cues. In terms of beauty, and the health of your hair, skin, and nails, Daniel has a few suggestions for working from the inside out. Foods that are good for your skin include turmeric, walnuts, cucumber, tomatoes and olive oil. Walnuts increase skin elasticity, cucumbers are hydrating and reduce inflammation, tomatoes act as natural sunscreen, and olive oil balances out oil production.

Preston Royal Village 6

Our top 5 food picks at Snap Kitchen include:

Easy Greens Juice – Packed full of fruits and vegetables that are great for your skin, and a little more sip-able than the Super Greens juice

Energy Boost Juice – A tropical combo of papaya, watermelon, lime, mint and coconut water

Snap War Bar – Made with nuts, quinoa, dates, and seeds, this is the perfect pre-workout energy bar

Turkey Chili – If you’re dairy free, dress this chili up with a fried egg on top, it’s a great lunch go-to

Ginger Glazed Scottish Salmon – A clean, filling, and tasty fish fillet that’s ideal for dinner

Visit Snap Kitchen online to learn about curbside meal pickup, home delivery, juice programs, the Snap Commit eating plan, or to get a nutritional health assessment from Snap’s local registered dietitian. Also – head to Daniel Magoon’s Instagram, @dmagoo, to get a first hand look at his “Snap-hacks.” These are creative adjustments to pre-existing Snap meals to insure you are never bored of your go-to dish. One of his most popular hacks? Add a shot of Snap Black Coffee to the Chai Cashew “Milkshake” and pour it over ice, for a refreshing, caffeinated, and dairy-free coffee drink.

Written for DFW Beauty Guide

unnamed

Recipe of the Month: Shakshouka

Welcome to the newest series here on Melancholic Magpie – Recipe of the Month! As most everyone knows, the only things I can successfully make in the kitchen is a cup of tea and pan of burnt cookies. Therefore, I’m turning this monthly installment over to my favorite chef, California Carter.

unnamed

A true epicurean, Carter Goffigon loves all things food, cooking and entertaining. Born and raised in Los Angeles, she grew up surrounded by fresh ingredients and year-round inspiration. She decided to pursue that passion as a teenager, working and training in some of LA’s best restaurants as a pastry extern. In college, she was introduced to the fascinating study of food history and power of food activism. Upon moving back to LA after graduation, Carter started a small (but growing) pop-up dinner series, called Food With Friends as a way to get back in the kitchen and bring together new friends in a metropolitan city. She’s passionate about changing the way Americans interact with food and believe how and what we eat can truly revolutionize our society.

I love eggs. Any time or day, scrambled, fried, poached, baked. Gimme. I’ve been reading a lot of recipes lately for Shakshouka, a Tunisian dish, in which you poach eggs in a spiced tomato sauce. Feeling inspired and, obviously, craving eggs, I thought I’d try my hand at a variation on this savory breakfast with what I had in my fridge. Mine turned out a bit more like a hash than a sauce but it was delicious, nonetheless. Here is a hearty and slightly Italian version, full of veggies, protein and flavor – perfect to set you up for an active and productive day!

Processed with VSCOcam with f2 preset

January 2015 Recipe: Spicy Tomato Poached Eggs

Serves: 2 or 1 if you’re hungry

Ingredients.

1 cup roughly chopped tomatoes

2 garlic cloves

6-7 Calvetrano olives, pitted

¼ of a small red onion, sliced

2 tablespoons Olive Oil

1 cup cooked vegetables (I used kale, mushrooms and diced sweet potatoes from a stir fry, I’d made the night before)

2 teaspoons balsamic vinegar

½ teaspoon cayenne pepper

A pinch of cumin

1 teaspoon Sriracha chili sauce

A pinch salt

2 eggs

1 tablespoon basil, sliced in a chiffonade

Supplies you’ll need

Small non-stick sauté pan

Food Processor (optional)

Steps

  1. If you have a food processor, chop together the tomatoes, garlic and olives until finely chopped and incorporated. If you don’t have a food processor, you can finely chop these ingredients by hand, it just may take a few extra minutes.
  2. In your sauté pan, heat the olive oil over a medium-low heat and add the sliced onions. Stirring a few times, cook your onions until they are soft and slightly caramelized, about 5-7 minutes.
  3. Add your cooked vegetables to the pan and toss with the sautéed onions. At this point, you’re building the base of your sauce, so its important to let the veggies cook together for a few minutes and develop some caramelization in the pan. (Really any vegetables will work for this recipe, just make sure they are all cut to about the same size, so they heat at the same rate)
  4. Add your tomato mixture to the pan and turn the heat to low. The tomato juice will begin to simmer, bubble and thicken, this is good!
  5. Add your vinegar, cayenne pepper, cumin, sriracha and salt. Stir to combine and let reduce for another minute.
  6. Crack your eggs into a separate bowl. One at a time, make a small well in the sauce and carefully pour the egg into the pan. Repeat with the second egg. Cover and let cook for 2-3 minutes. You’re looking for the whites to be cooked through while the yolk should still be runny – test this by carefully touching both parts. The sauce will be pretty thick at this point, as much of the liquid has cooked off and been absorbed by the vegetables.
  7. Turn off your heat and gently scoop your eggs into two bowls. Surround the eggs with the vegetables and extra sauce. Garnish with some chopped basil, a sprinkle of kosher salt and a little drizzle of olive oil. (I serve mine with a slice of crusty bread to soak up the juices, but that is optional)

Note: If you want a more vibrant red tomato sauce, I would suggest using a vinegar like Red wine or champagne. I only had balsamic on hand, which has a delicious sweet flavor but will turn the sauce slightly brown.

The GEM Juice Bar

SRxSj.So.58

So you’ve made those New Year resolutions, but are you sticking to them? If you’ve vowed to do something along the lines of “get healthy,” or “lose weight,” this year, keep in mind that ingesting good food is part of that commitment. While many think that going to the gym a few days a week is enough to reach your health and fitness goals for the year, in most cases, that’s not going to make much of a difference if that’s all your doing. Instead of spinning your wheels at the gym and getting nowhere, look critically at what you are putting in your body – it is an easier (and faster) way feel better internally, and in turn, look better externally.

If the state of your health has you feeling overwhelmed, one of the best ways to get back on nutritional track is through drinking organic, cold-pressed juice. As it turns out, juice is the best way to get your recommended daily amount of fruits and vegetables. When ingesting fruits and veggies in the form of juice, your body doesn’t have to work as hard to break down the bulky material component. Thus, you can quickly absorb the juice’s natural vitamins, phytonutrients, and enzymes. As for other amazing benefits of drinking fresh-pressed juice regularly? Expect weight loss, reduced unhealthy food cravings, a clear complexion, and increased energy.

Intrigued? Head over to our juice bar of choice – The GEM – located in Preston Center at 6030 Luther Lane. Not only do we love their glam tagline, “diamonds on the inside,” but everything on their menu, from the juice to the salad, is downright delicious. The GEM was opened in (YEAR) by health-conscious Dallasites, and juice alchemists, Mary Kathryn Bass and Leslie Needleman. Bass and Needleman are committed to crafting recipes that are not only highly nutritional, but approachable and tasty, too. At The GEM, juicing is more than a passing trend, but the key to leading a healthy, happy life. Head over to The GEM today, open from 7:30 am to 2:30pm Monday through Saturday, for a fresh juice, a filling smoothie, or to sign up for a toxin-eradicating juice cleanse. We don’t know about you, but The GEM keeps us feeling bright and shiny even when it’s cold and dreary out.

From the Menu: DFW Beauty Guide’s Top 5 Picks

Green Glow Juice, kale, cucumber, lemon, apple ginger (6.5/8)

Golden Glow Juice, fresh tumeric, lemon, orange, agave, fresh ginger, cardamom, Himalayan sea salt, filtered water (5)

Peridot Lemonade, cucumber, lemon, agave, filtered water (5)

Tahitian Pearl Smoothie, banana, almond butter, cashew milk, coconut manna, dates, maca, bee pollen, cacao (8)

Sparkle Berry Smoothie, seasonal berries, banana, mango, pomegranate, hemp milk (7)

Written for DFW Beauty Guide

unnamed

DIY Face Washes for Sensitive, Acne-Prone Skin

tumblr_inline_ne8aqsPhgF1rukcld

Over the years, I have struggled to find a face wash that thoroughly cleaned my skin without leaving it feeling dry and tight. In an attempt to both save money and support cruelty-free products, I found that skincare products using kitchen ingredients actually yield the best results. Things found in your kitchen – anything from baking soda to avocados – can be used in your daily skin care routine. The best part about trying things from your kitchen? Not only are you avoiding harsh cosmetic chemicals, but you can also sample face washes, exfoliating scrubs, shampoos, and hair masks for no extra cost outside of your grocery bill.

Below are three different recipes for face washes using ingredients probably sitting in your kitchen right now. The ones I have chosen worked for my sensitive and extremely picky skin, however you might have to adjust the recipes slightly to fit your needs. The recipes range in preparation time, and number of ingredients. In my experience, the following washes left my skin feeling bright, fresh and moisturized without using any sort of moisturizer afterwards. That being said, keep in mind that the texture of these washes (i.e. raw honey) will not feel like a generic, soapy wash when being applied to the skin. Lastly, regardless of which DIY wash you try, remember that your results are directly dependent on the quality of ingredients you use.

1. Coconut Oil Face Scrub: This scrub is good for clearing up acne, and for people who have combination skin. For those who are interested in converting from mainstream face washes, this will obviously resemble the feeling of an exfoliator, however it will not foam or create bubbles. After using this scrub, your face will be left with a thin layer of coconut oil that will continue moisturizing your face throughout the day. As a note, if you plan on washing your face then applying makeup straight afterwards, this may not be the wash for you. Therefore, consider using this scrub at night before bed. The following recipe makes a large batch of the scrub that will last for several months.

Items Needed:

  • Wide-mouth Mason Jars, or another similar container you can hold and seal the mixture in for storing
  • 1.5lbs of Organic Turbanado Raw Cane Sugar (larger granules)
  • 2 cup of smaller grain sugar (such as brown sugar)
  • 7-10 oz of medium-high heat coconut oil
  • Optional: tea tree essential oil*

Directions:

  • To turn the coconut oil from a solid into a liquid (see last week’s benefits of Coconut Oil post): Fill a large bowl with hot water and place the opened jar of coconut oil in the middle with the surrounding water going about half way up. Let the oil sit until clear and almost all melted.
  • Fill a bowl with the sugar mixture and pour the jar of oil in. Stir together.

To Apply:

  • Wet your face with a warm cloth
  • Scoop out a nickel size portion of the scrub. If you have acne and want the additional clearing effects from essential oils, put two drops of tea tree essential oil in your daily scoop of scrub. High quality tea tree is astringent and good for cleaning.*
  • Apply the scrub to the skin until the sugar has dissolved.
  • Rinse your face with warm water, massaging the oil into your face as you rinse.
  • Pat dry with a clean towel.
  • Repeat 1-2 times daily. For those with dryer skin, using this scrub once at night will be sufficient.

Information provided by Michelle Bardwell, Registered Aromatherapist. I only use essential oils from her practice and skin care line, Flower Road Natural Therapies. Essential oils purchased at Whole Foods or other general outlets are diluted and NOT of high quality. As for tea tree, be careful not to get it near your eyes, and test the oil on your arm before applying it to your face to make sure you do not have an adverse reaction. If you have dry, sensitive skin, either avoid using tea tree in your scrub, or just use one drop. In the original recipe for the coconut oil scrub, the author added the essential oil to the whole batch of scrub upon making it. While this will give you the aroma of the essential oil you use, it will not have ANY healing or cleaning effect on your skin once you actually apply it to your face.

2. Foaming Honey Face Wash: For those who are hesitant about switching from a mainstream wash to a kitchen-ingredients-only wash, this one is for you. While it is extremely simple, and gentle on the skin, it will foam and act like a “normal” face wash. This wash will make you feel like your face has been thoroughly washed, but with mild, moisturizing ingredients.

Items needed:

  • Clean bottle with pump, you can also make your own with a mason jar and a pump
  • 3 tablespoons of raw, local honey
  • ½ cup vegetable glycerin
  • 2 tablespoons liquid castile soap (Dr. Bronner’s is my favorite)

Directions:

  • Mix ingredients together in desired container

To Apply:

  • Apply to face in a circular motion and massage into face for at least 30 seconds before rinsing with warm water
  • Pat face dry with clean towel

3. Sensitive Skin Honey Wash: For people with extremely sensitive skin, the less ingredients the better. This honey wash can be used two times a day and is extremely moisturizing. It is best for those with dry skin (who should avoid both exfoliators and castile soap), and those experiencing a breakout. If you’re going to use honey to wash your face, be sure to purchase a high quality, raw honey. Although washing your face with honey may sound like a sticky situation, if done right, it is easy to put on, easy to take off, and leaves your skin super soft and even-textured.

Items needed:

  • A jar of raw, local honey. I suggest buying a jar just for your bathroom so you don’t have to shuffle the same jar back and forth to the kitchen.
  • Optional: To tone your skin afterwards, you’ll need apple cider vinegar and a sealable container of your choice

Directions:

  • The honey will not need any mixing, you can use it directly from the jar
  • To make the toner, combine ½ a cup of water with 2 tablespoons of apple cider vinegar in a container of your choice

To Apply:

  • Wet your face with warm water – in order to successfully apply honey afterwards, this part is crucial
  • Apply a quarter-size of honey to your face. You can either scoop it out the jar with clean fingers or a spoon.
  • Massage honey into your skin in circular motions avoiding the eyes for at least a minute
  • For best results, you can let a thin layer of honey sit on your skin for 10 minutes – this will heighten the moisturizing effect
  • Splash your face with warm water to get the honey off, or rub it off with a wet washrag. Be sure to rinse your forearms too – when I use this wash, honey often drips down to my elbows without me noticing. As long as the honey on your face doesn’t dry during this process, you will not experience stickiness at all.
  • Pat your skin dry with a clean towel
    • For extra soft, clean skin, apply the apple cider vinegar toner afterwards. Simply pour a little bit on a cotton ball and dab it onto your skin, avoiding any dry patches.

New in Dallas: Grange Hall Restaurant

In November, I saw that my favorite, inaccessibly expensive shopping locale in Dallas, Grange Hall, opened a restaurant attached to their store. Grange Hall is a final destination for all things glamorously melancholic. Think skulls, dried roses, colorful taxidermy, and diamonds. In the store, they offer a curated selection of brands in a expertly designed space. The unnamed restaurant addition is no different: the menu entries are few, and the display is beautiful.

Grange Hall suggests you make reservations by calling 214.443.5175. However, I went with a friend on a Friday afternoon within their first week of opening, and we were able to squeeze in at the bar without waiting. Expect: an immersive environment, excellent people watching, and a hefty bill.

tumblr_inline_nf7fusUYvL1rukcld

Not surprising, but my favorite part of the Grange Hall restaurant experience was the table setting. The mixture of modern graphics, neutral colors, and snippets of 18th-century paintings is spot-on in my book. (NOTE: The sections of paintings shown on the menu and on the bill folder are both of Madame de Pompadour. Pompadour was known as the Queen of the Rococo, and was King Louis XV’s mistress and cultural advisor. I’m reaching out to Grange Hall to ask why they chose her image twice.)

For lunch I ordered the “Snob Sandwich” ($26) – which was filling and rich. In surveying the dishes coming out of the kitchen, it was apparent that the Grange Hall restaurant is all about food presentation … and caviar.

After lunch, my friend and I split the madeleine cookies, which came out fresh baked, powdered in sugar, and served with honey. We also ordered a pot of Mariage Frères jasmine tea ($15). Had the “Book of Teas” not seduced me, I don’t think I would have gone through with such a steeply-priced pot of tea. Grange Hall sells this premier brand of French tea in their adjoining store as well, should you become smitten with a certain flavor in the restaurant.

tumblr_inline_nf7g3uhXFB1rukcld

tumblr_inline_nf7gfvxgZ21rukcld

tumblr_inline_nf7gggQNZj1rukcld

While the experience was certainly one to remember, the price alone will unfortunately make the Grange Hall restaurant impossible to visit on a regular basis. Ideally, the restaurant would eventually offer $15 sandwiches to those of us who don’t drive Bentleys. So for now, save Grange Hall for (very) special occasions. Dude, no way is right.

To round out your Grange Hall experience, be sure to check out their collection of shop-able oddities, jewelry, and apothecary offerings while waiting for a table or after lunch. Some of my favorite things from the Grange Hall store last week included taxidermy bird vignettes and sampling the incredible perfume line, Les Parfums Historique.

tumblr_inline_nf7gz82Sz51rukcld

tumblr_inline_nf7gzjcr4S1rukcld

Interview with Ashleigh Foster on Plant-Based Diets and Eco-Friendly Beauty Products

Ashleigh Foster is a filmmaker, a new mom, and a proponent of plant-based diets and eco-friendly beauty products. Ashleigh, a Hockaday alum, writes a lovely, inspiring blog called “I Spy the Beautiful,” that covers everything from the story of her daughter’s home birth, to her favorite vegan recipes. Keep reading to pick up a green smoothie recipe, directions for a DIY sea salt hair spray, and useful tips on transitioning into a vegan diet.

Screen Shot 2015-01-07 at 4.12.46 PM

Twyla Shelmire: What is the difference between a vegan diet, a raw diet, and a plant-based diet?

Ashleigh Foster: A plant-based diet is the broadest term and it just means that you try and base most of your meals around plant foods: vegetables, grains, legumes, etc. This has become a very popular term with all of the recent research suggesting that a diet largely comprised of plants is the healthiest long-term approach.

A vegan diet has more of an ethical basis. It excludes all products that are derived from animals, so any meat, poultry or fish but also and dairy products, eggs, even honey isn’t considered vegan.

A raw diet means you’re not cooking anything and are eating a lot of raw vegetables, fruits, nuts, and seeds. Some people choose to include animal products in a raw diet—raw fish and raw (unpasteurized) dairy, which is why you will hear people describe themselves as “raw vegan” to specify that they are both raw and vegan.

TS: Have you always been vegan? Was there someone or something that inspired you to make the transition, or did it just make you feel better?

AF: I wasn’t raised vegan at all and it has been a very slow transition for me. About seven years ago I was struggling with on going depression and just general lethargy. I didn’t wake up with energy in the morning and I just sort of went through life feeling tired. I began to really look at the connection between what I was eating and my energy. As I transitioned towards a healthier diet, I felt better and better. I lost weight. My skin cleared up. My energy increased.

You’ll get a lot of people telling you that making these kinds of big changes to your diet is extreme. They say that like it’s a bad thing. But I love extremity. I’m not about balance at all. I don’t believe in it. The thing that I see is that the place we have gotten to culturally with our food choices is extreme. You know what’s extreme to me? Hot Cheetos. I was drinking a green smoothie in front of a girl eating a bag of hot Cheetos once and she told me it looked weird. Her fingers were dyed BRIGHT ORANGE! It only makes sense that we’re going to have to take some extreme measures in order to get back to a place that is more natural if we want to feel good.

I didn’t go vegan right away, that part came last. When you start feeling better you’ll want to do good things for the world and you’ll start really looking at the effect your choices have on the world. You’ll start caring about things more because you’re becoming more connected to yourself and that is always going to connect you more to the planet. So eating vegan as much as possible just becomes what you want to do because you want to be more loving and compassionate. And I don’t want people to think it’s so out of reach either, you don’t have to be perfect at it, I’m definitely not. But you just keep aiming to be compassionate in your choices and it ends up being amazing for your health and for the planet.

Screen Shot 2015-01-07 at 4.13.45 PM

TS: What are some common misconceptions about being vegan or eating all raw?

AF: I think one of the biggest problems is that people feel it’s inaccessible. They hear vegan or raw and they think “Oh I could never do that”. And that’s a huge mistake because this is not about perfection, nothing is. This is just about learning and growing. So I’d encourage people to go vegan for one day a week. Eat a raw breakfast in the morning (a green smoothie for example). See how you feel. Just keep moving in a positive direction. People get overwhelmed and it immobilizes them into not making any changes and that’s sad. Even little changes will add up in an amazing way.

The other huge misconception is that eating healthy has to taste bad or be miserable. If it tastes bad, you’re not doing it right. Granted, there does need to be a transition period where you’re getting used to new flavors. But what a lot of people don’t realize is that your tastebuds are constantly changing. If you give yourself 3 weeks to get used to things you’re going to find a whole new palette of foods that appeal to you. Then the harder work can happen of letting go of some of our emotional connections to foods that are unhealthy because your Grandmother fed you donuts every time you saw her and she really loved you so now when you eat donuts you feel loved. You can start to see those things and rewrite those thoughts in your head. The truth is, you are loved. Grandma loved you. It had nothing to do with the donuts. And then you can start to believe that you deserve to be healthy and to feel good. Once that happens, there’s no holding back.

TS: When you are cooking certain dishes or putting together juices, is it intuitive what ingredients to use, or do you work from a cookbook?

AF: This is the most fun thing and something that I really love is that once you become familiar with a new palette of foods to cook with you can get really creative, especially when you’re cooking raw because you can taste exactly what is coming out as you go. I make a lot of stuff up as I go. But I love to use cookbooks too and often will flip through them for inspiration. One thing I’ve learned that I use a lot is that we are most satisfied by a balance of flavors. We’re looking for something salty, sweet, acidic, and fatty all at once. If you think of your favorite foods, most of them have all four of those going on at once. That’s where you get chocolate chip cookies with sea salt on top. Chocolate is a little acidic. Cookies have sugar and butter. And then you add some salt and it’s like tastebud crack. When I’m making any dish, I always try and remember that.

Screen Shot 2015-01-07 at 4.14.57 PM

TS: What are some of your favorite foods, dishes, and juices?

AF: A favorite salad dressing of mine is cashew butter, sage, garlic and lemon juice with a little salt. It feels super indulgent because it has all of those components I just mentioned that your mouth is looking for. You can use that as a template for making your own dressings. Pick a nut butter, your favorite herbs, some garlic, and lemon. Blend that with a little water and maybe some maple syrup if you want it a little sweeter. That’s a great dressing in so many combinations. I love tahini + ginger or almond butter + basil. The options are endless.

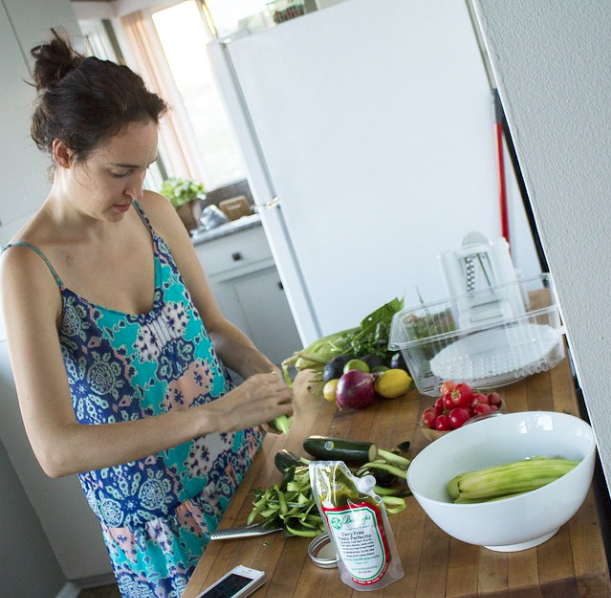
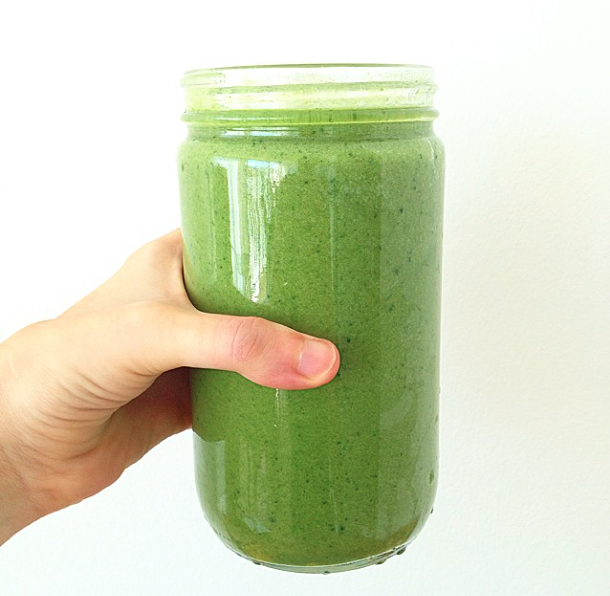
I love doing that, creating a sort of template to experiment within. I make a ton of green smoothies by combining frozen fruit, fresh fruit, light greens and dark greens with a liquid. I think people can sometimes be scared to experiment because they don’t want to get it wrong, so having a guide can help. For smoothies you want to use about the same amount of frozen fruit, fresh fruit, and light greens, with about half that amount of dark greens. Add liquid like coconut water or almond milk until the consistency is what you like. My favorite is frozen banana, ripe banana, coconut water, and kale. In that one I leave out the light greens completely. It’s not an exact science. Don’t overdo it on the dark greens or you wont want to drink it. My sister makes green smoothies that look like swamp water because she thinks that is healthier and then she won’t drink them. Make it taste good and you’ll do it over and over again.

Screen Shot 2015-01-07 at 4.13.06 PM

TS: Do you stick to non-toxic beauty products? If so, what are some of your favorite brands or products? 

AF: I really believe in non-toxic beauty products. You absorb everything that goes on your skin. Not only that but those products that get rinsed off in the shower get into our water system and wreak havoc on our whole ecosystem. My favorite beauty products are no products at all. Our bodies are beautiful. Our imperfections are straight up beautiful. I try to wear make up as little as possible. Maybe a few times a year. I know some people find it fun but I find it fun to feel healthy and glowing from the inside out. If you really feel good inside and you’re treating your body right, your skin is going to be healthy and your hair will shine and your eyes will just glow. People are going to notice and more than that, you’re going to radiate from the inside out. Make up is just trying to make people look healthier. Covering blemishes, creating brighter eyes, giving cheeks a flush. It’s all designed to give the appearance of health but I say just go for the real thing.

My skin care routine is really basic. I rinse with water and exfoliate with scrubby gloves daily. If my skin is getting a little dry in colder weather I will use a little bit of moisturizer. I use Detox Moisturizer by Sonya Dakar. When I do use makeup, my absolute favorite brand is RMS, which is created by a woman who did makeup for Victoria Secret models for a long time. They’re all based in coconut oil and she has a great really natural color palette. Definitely check them out. There’s a store called Evolue that only carries really awesome products that are all good for the environment and your skin. You can check them out online. Oh also, I LOVE the Weleda citrus deodorant. It’s the best natural one out there. A lot of natural deodorants don’t work. That one smells fantastic and it works.

TS: Do you have any DIY beauty recipes you’d like to share? Or do you keep any specific kitchen ingredients on hand for beauty purposes?

AF: The one thing I’ve had fun making myself is a sea salt hair spray that can give you those beachy waves. I’ve seen it sold by different hair product lines. It’s really easy to make. You basically simmer 16 oz of water on the stove and add about 1/3 c of sea salt until it dissolves. Then cool the water and add 10 drops of lavender essential oil. I add a few drops of coconut oil, maybe like an 1/8th of a teaspoon just to give a tiny bit of shine. Let it cool and store it in a spray bottle. If you spray it on damp hair, it’ll give you that beachy look of being out at the ocean. I have curly hair and it works great. I’m not sure what it would do on straight hair.

I keep Epsom salts around for some great hot baths. I love to add some essential oils of lavender or chamomile to the water. I use jojoba oil to moisturize because I don’t really like to use coconut oil, which a lot of people love. Jojoba oil is a really mild seed oil that you can add scented oils to if you want. I always keep some castor oil around which is great for healing cuts or dry patches of skin. If I want to feel absolutely fantastic, I take a long hot bath and then shave. Then I rinse off in a cool shower and exfoliate with scrubby gloves. Then I get out and immediately use jojoba oil to moisturize my arms and legs and neck, etc. I put some moisturizer on my face. Comb my hair and spray with the salt spray and then brush my teeth and put on comfy pajamas. You will feel like a million bucks. Clean from head to toe and absolutely naturally gorgeous, which I guarantee you are.

Screen Shot 2015-01-07 at 4.14.29 PM

For a daily dose of I Spy the Beautiful, head to instagram!